Overall, I am disappointed that after all that hard work modelling and skinning I couldn’t actually get my animation to look realistic, and most of all, work.
I do think that I went way overboard and was way too ambitious with what I wanted to achieve (for someone who is extremely inexperienced with 3DS MAX) and didn’t truly think through the process of creating this animation. I had everything clear in my mind from a storyboard point of view, but from a technical point of view I did not think things through. For example, when skinning, I completely skinned every single model from head to toe, and none of these worked in the end. Nor did I need to because headshots obviously didn’t require the toes and legs to be skinned. I always make things too hard for myself and this was no exception.
This resulted in a lot of time being wasted on unnecessary things. In the end I do regret making such an imaginative and complex animation; I should have focused more on keeping it simple, to make it more successful on the whole.
If I were to use 3ds max in the future, or indeed any other projects I do in the future, I really need to really think things through from a technical point of view as well to really determine if I am actually capable of creating the work with my skill set, because I have simplified my animation greatly from the initial storyboard to just try and meet the deadline.
Thursday 6 May 2010
My Animation
Here is the final video, in MP4 format. There was no option that I could find to export to AVI, the only suitable presets in Premiere Pro and Adobe Media Encoder were .MOV or .MP4.
---
*EDIT*
Upon uploading this file, it does not display correctly on my browser. The final video is not like that, it does work!
Finishing my animation
Due to the skinning problems I had that I could not fix, the quality of my final animation is not as good as intended. As stated, when the meshes had the materials applied the skinning went to pieces (after all that hard work) so I reverted back to the models before the materials were applied, (and I have proof that the skinning worked!) and animated these, but this also failed.
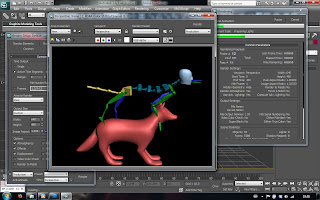
I was left with no other option than to show my audience the movements of my intended animation in the form of only the bipeds.
This does look bad, but due to time running out I had no other choice. An advantage to doing it this, is that if in the future I were to come back to this animation and somehow find a way to fix this problem, the basis for it is already done. All I would have to do is export the scene (the backgrounds, lights and camera(s) ) and save the moving biped file (.BIP) and apply it to the ‘fixed’ mesh(es). And hey presto, I have my animation.
At least with my moving bipeds you can see my intentions for the animation visually rather than just the paperwork. I included the necessary lighting and cameras so literally the only thing that needed sorting was the skinning problem.
Premiere Pro editing allowed me to add the sounds I recorded and give my animation a realistic touch.
Again, due to both the time constraints and my inexperience with 3DS MAX the scenes don’t look as good as they could. I am really disappointed because my primary objective so to speak was to make this animation look realistic, hence the great detail and focus on the modelling portion of this project. The materials like I said is where this went wrong, but I did struggle with materials last Semester also.
One last thing is that I do not understand how the walking animaton I have at the beginning works ok (the skinning mucks up and the legs do not move how I made them move in the MAX file originally – 3DS mucking up my work again!) and the latter files do not even have a moving mesh let alone an almost complete scene. I just cannot comprehend it.
More problems
I have tried and tried and tried again to get my models to animate correctly, and to no avail.
A problem I have come to face is the skinning, but I cannot figure out the problem.
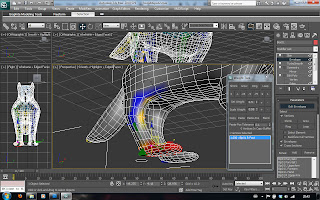
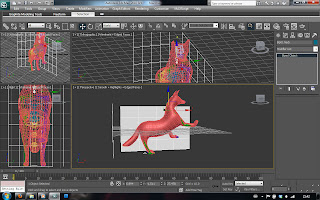
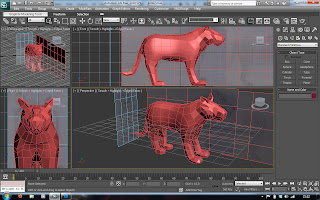
When I move the biped, the skinning works fine, I have skinned correctly and the mesh moves accordingly:
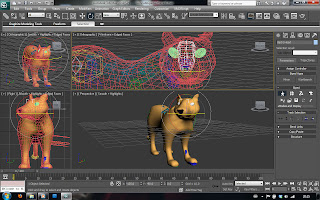
But as soon as I go to the motion panel, and move the biped in exactly the same way, only the biped moves. It's so strange.
 (I had turned autokey off before taking this screenshot, and I tried doing this out of figure mode because an error came up saying that keys cannot be made whilst in fugure mode. Everything I tried did not work.
A problem I have come to face is the skinning, but I cannot figure out the problem.
When I move the biped, the skinning works fine, I have skinned correctly and the mesh moves accordingly:

But as soon as I go to the motion panel, and move the biped in exactly the same way, only the biped moves. It's so strange.
 (I had turned autokey off before taking this screenshot, and I tried doing this out of figure mode because an error came up saying that keys cannot be made whilst in fugure mode. Everything I tried did not work.
Wednesday 5 May 2010
Animation Problems
As a result of the last problem, I decided to go back to my original models to animate (the ones where the skinning was successful. Now, I thought I could at least get the motions I intended my models to do shown, even if there were no materials used.
Upon trying this, now even these models will not work. I tried importing a .BIP file to make the fox walk that is shown a few posts ago, and that completely messed up the files.
I then tried this with my jumping fox cub. The idea I had was to import the fox cubs into the scene with the mummy fox and have one walking and two jumping along to give a bit of variety. I created the .BIP file and saved it.
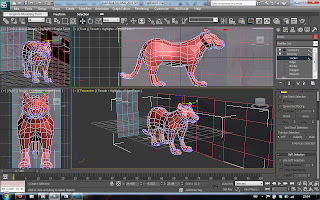
Shown is my attempt at applying this to the old mesh using the mixer.

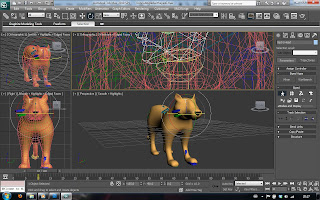
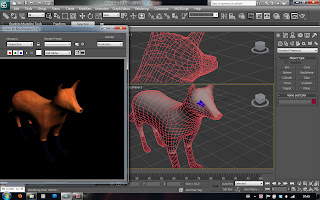
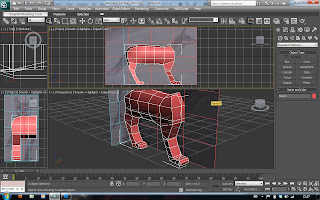
As you can see, 3DS Max recognises the fact that the mesh has been moved as soon as it is imported, and as it has been skinned the mesh moves accordingly. (My skinning with the hind legs was not as good as I initially thought because the 'bone' is protruding from the rear end of the mesh). However upon rendering you can see below that even though the skinning is successful (and even once modified upon selecting the skin modifier on the right hand side menu and showing envelopes actually shows my skinning is still in tact) the biped is seperated from the mesh.
 And post-rendering, the fox mesh regains it's original position rather than still being squatted down as shown above in this post. So upon rendering everything goes wrong!
Upon trying this, now even these models will not work. I tried importing a .BIP file to make the fox walk that is shown a few posts ago, and that completely messed up the files.
I then tried this with my jumping fox cub. The idea I had was to import the fox cubs into the scene with the mummy fox and have one walking and two jumping along to give a bit of variety. I created the .BIP file and saved it.
Shown is my attempt at applying this to the old mesh using the mixer.

As you can see, 3DS Max recognises the fact that the mesh has been moved as soon as it is imported, and as it has been skinned the mesh moves accordingly. (My skinning with the hind legs was not as good as I initially thought because the 'bone' is protruding from the rear end of the mesh). However upon rendering you can see below that even though the skinning is successful (and even once modified upon selecting the skin modifier on the right hand side menu and showing envelopes actually shows my skinning is still in tact) the biped is seperated from the mesh.
 And post-rendering, the fox mesh regains it's original position rather than still being squatted down as shown above in this post. So upon rendering everything goes wrong!
Skinning problems
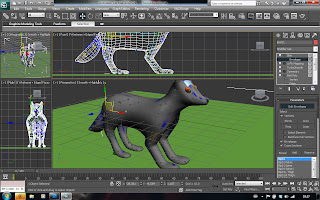
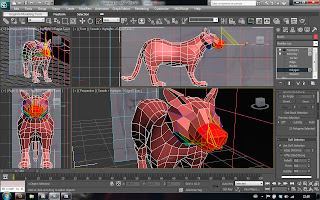
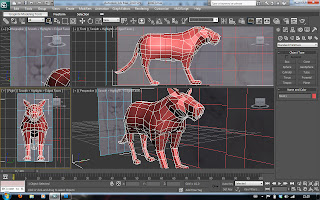
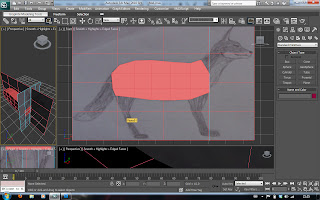
Ok, so as you can see by the last post, I had trouble with the skinning. Now I could not figure this out because the skinning worked perfectly (as shown).
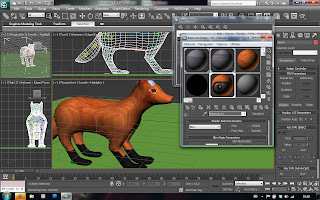
After a lot of playing and a hell of a lot of thought, I decided it must have been the materials that were used. Surely enough, after the UVW map was applied, the skinning went to pot:
I was going to retry skinning my models. After a lot of thought, what with the deadline creeping in, I really thought about what I had to skin this time. (The first time round, I completely skinned every model in detail (unnecessary detail). I decided that all I needed to do with my new simplified animation was the lion and lion cub's head and shoulders, and the fox and fox cubs' whole bodies.
However, after a lot of time spent wasted on trying to re-skin jus one leg of the fox, 3DS max kept changing the skinning without me actually doing anything to those vertices. It actually wouldn't let me change some as well.
So after all that time wasted the first time round, when it worked absolutely fine, now the skinning just will not work at all.
After a lot of playing and a hell of a lot of thought, I decided it must have been the materials that were used. Surely enough, after the UVW map was applied, the skinning went to pot:


I was going to retry skinning my models. After a lot of thought, what with the deadline creeping in, I really thought about what I had to skin this time. (The first time round, I completely skinned every model in detail (unnecessary detail). I decided that all I needed to do with my new simplified animation was the lion and lion cub's head and shoulders, and the fox and fox cubs' whole bodies.
However, after a lot of time spent wasted on trying to re-skin jus one leg of the fox, 3DS max kept changing the skinning without me actually doing anything to those vertices. It actually wouldn't let me change some as well.

So after all that time wasted the first time round, when it worked absolutely fine, now the skinning just will not work at all.
Animating
Here is where I will write about animating.
This is my first complation in Premiere Pro to see if the exports worked. It is very fast because I didnt adjust the framerate etc of the render.
This is my first complation in Premiere Pro to see if the exports worked. It is very fast because I didnt adjust the framerate etc of the render.
Tuesday 4 May 2010
Materials
The materials is where everything started to go wrong. I always wanted my models to look realistic, and upon thinking about it now it probably would have been better to have my models as simply colours. This would have saved the need for a UVW map.
The UVW map made the models look horrible. Starting with the fox and the fox cub, I tried to get an image of a foxes fur to make the model look like it was covered in fur, as the hair and fur modifier would have been horrible to animate and having had previous experience with that modifier I cannot control it.After playing with the UVW map for hours, I had to settle for what it currently looks like and move on, as the deadline was drawing in. All that hard work to get the models look like a realistic shape and they look disastrous.
Then, the eyes. I could not get the eyes to position correctly with the UVW map. I had 4 polygons where the eye was supposed to show and again playing for hours to no avail.
I HATE 3DS MAX!
I created a sphere and moulded it to more of an oval shape to suit the model. I then seperately set the material for the eye to this sphere and placed it halfway into the model. This looked semi-decent so I settled for this option and reiterated it for all my models.
I then found that when moving the head, the eyeballs as it where did not move. After a little investigation it was found that I could 'weld' the eyes to the biped (and in the end this is about one of the only things that still works).
For the lions I did decide to use a simple colour all over save for the eyes as mentioned earlier.
For the lion (male) I converted the skinned model to an editable mesh, (as it had been turbosmoothed, I had more polygons to play with!). I dragged multiple vertices out to create 'spikes' of hair for the mane and set a seperate material ID for the mane area and coloured it a deep brown. This turned out quite successfully. Even though it was simple I think it worked quite well.
The UVW map made the models look horrible. Starting with the fox and the fox cub, I tried to get an image of a foxes fur to make the model look like it was covered in fur, as the hair and fur modifier would have been horrible to animate and having had previous experience with that modifier I cannot control it.After playing with the UVW map for hours, I had to settle for what it currently looks like and move on, as the deadline was drawing in. All that hard work to get the models look like a realistic shape and they look disastrous.

Then, the eyes. I could not get the eyes to position correctly with the UVW map. I had 4 polygons where the eye was supposed to show and again playing for hours to no avail.
I HATE 3DS MAX!
I created a sphere and moulded it to more of an oval shape to suit the model. I then seperately set the material for the eye to this sphere and placed it halfway into the model. This looked semi-decent so I settled for this option and reiterated it for all my models.

I then found that when moving the head, the eyeballs as it where did not move. After a little investigation it was found that I could 'weld' the eyes to the biped (and in the end this is about one of the only things that still works).
For the lions I did decide to use a simple colour all over save for the eyes as mentioned earlier.
For the lion (male) I converted the skinned model to an editable mesh, (as it had been turbosmoothed, I had more polygons to play with!). I dragged multiple vertices out to create 'spikes' of hair for the mane and set a seperate material ID for the mane area and coloured it a deep brown. This turned out quite successfully. Even though it was simple I think it worked quite well.
Skinning the models
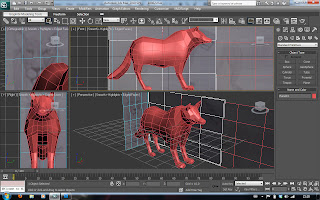
Skinning, at first, seemed easy. Having watched a video tutorial, I picked it up quickly (or so I thought).
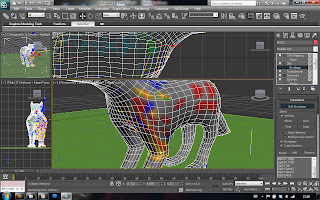
It was recommended that you use mainly only 1, 0.75 and 0.5 settings when assigning parts of the mesh to the biped, unlike when the model is automatically skinned and ranges to 0.1 showing blue on the mesh.
This seemed pretty simple, and I kept my meshes completely red, orange and yellow.
I skinned each of the four types of model exactly the same, assigning the vertices in the direct vicinity of the "bones" to be attached to it.
(pic of skinning)
I found the 'loop' tool very handy especially working with four legs as there was always something to worry about in the background so I couldn't drag across the screen.
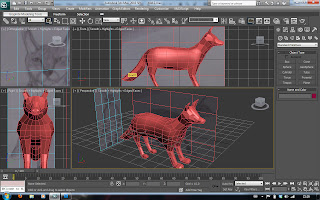
I have proof below that my skinning did actually work quite successfully by manipulating the mesh out of its original shape:
It was recommended that you use mainly only 1, 0.75 and 0.5 settings when assigning parts of the mesh to the biped, unlike when the model is automatically skinned and ranges to 0.1 showing blue on the mesh.
This seemed pretty simple, and I kept my meshes completely red, orange and yellow.
I skinned each of the four types of model exactly the same, assigning the vertices in the direct vicinity of the "bones" to be attached to it.
(pic of skinning)
I found the 'loop' tool very handy especially working with four legs as there was always something to worry about in the background so I couldn't drag across the screen.
I have proof below that my skinning did actually work quite successfully by manipulating the mesh out of its original shape:

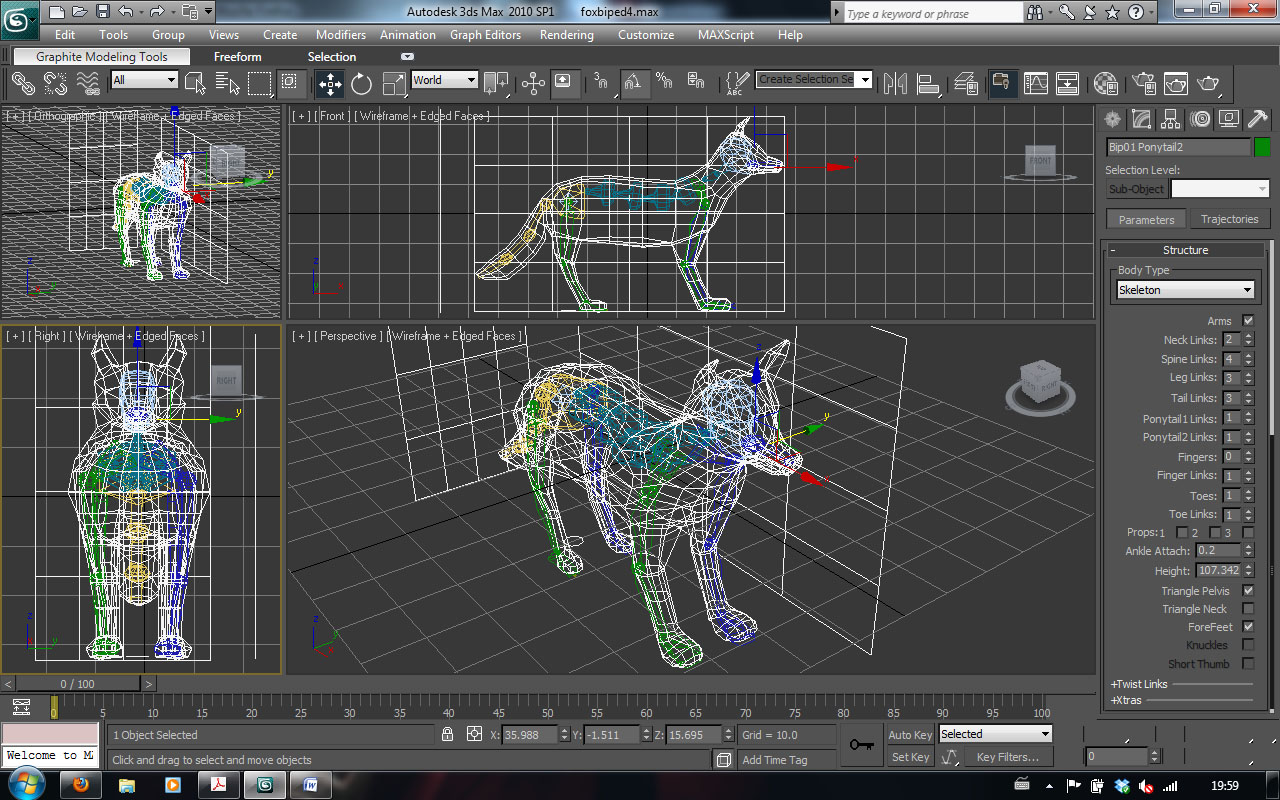
Creating The Bipeds
Creating the bipeds was actually surprisingly easy. I firstly made the biped for the fox, fitting it exactly to the mesh. I then copied it to each of the other models and manipulated it as necessary.
Starting with a two-legged human was a tad weird. Rotating the body onto it's front was a good start. moving the legs and adjusting the bone structure took a few tries and after a little experimentation I decided to just have the back legs exactly the same as a humans only facing backwards (rather than having an extra link).
I decided to seperate the tail into three links as not much movement was needed.
The ponytail was a good way to manipulate the jaw.
Wednesday 17 March 2010
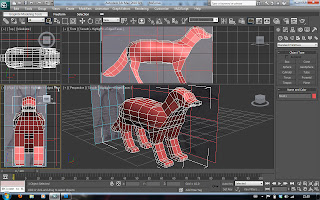
Modelling; Lion Cub
I have now altered my Lioness model to form my lion cub.
Little alterations were made, to make the lion cub cute and chunky, similar to the fox cub. These are common features of cartoon characters and babies, "cute and chunky".
I moved vertices, shortened the legs, scaled the muzzle in the y axis, and made the tip of the tail more like the bud of a flower and gave it more of a flick. I chose to leave the "bottom" quite large, and dip the back a tad. I also made the neck a lot thinner.
 Here is the final lion cub. Again I have chosen to wait before scaling the model down until I organise all the models into one scene.
Little alterations were made, to make the lion cub cute and chunky, similar to the fox cub. These are common features of cartoon characters and babies, "cute and chunky".
I moved vertices, shortened the legs, scaled the muzzle in the y axis, and made the tip of the tail more like the bud of a flower and gave it more of a flick. I chose to leave the "bottom" quite large, and dip the back a tad. I also made the neck a lot thinner.

 Here is the final lion cub. Again I have chosen to wait before scaling the model down until I organise all the models into one scene.
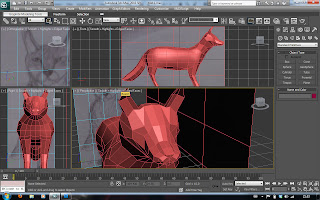
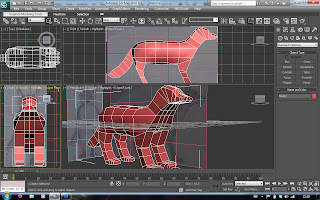
Modelling; Lion
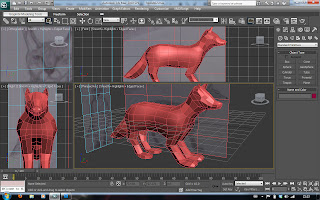
Once again, I have modified the fox I have created rather than start from a box. Even though I have created these low poly models in a very small fraction of the time it took me last semester, it was still easier and faster to work with the fox model than create something this similar from scratch.
 I manipulated the model by moving vertices (e.g. arching the neck as shown above), scaling portions (for example thickening the legs) and generally playing to get the right shape.
 Once again I did the 'side-view' first, then played with the 'front' view of the object to adjust the nose and width of the lion.
 Here is the final low-poly version of my lion.
Modelling; Fox Cub
Using the 'finished' low poly fox, I simply moved vertices, scaled certain portions of the model up and down (not just the whole model) to make the whole thing 'chunkier' and cuter. The first image shows the front legs being thicker only.
 Other things I changed where making the (*cough*) 'bottom' rounder and generally larger, the shoulders and chest area, the tail and a few odd vertices. When scaled down there is a difference between this and the original model.
I decided not to scale down at this stage, I will wait until I put the models in the same scene.
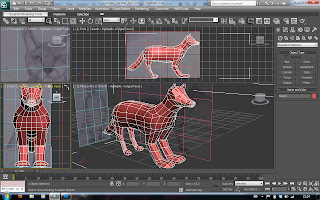
Modelling; Fox Part 2
Continuing with my fox model, having had a good side view (save for the ears) I started to work with the 'depth' and finalize my fox.
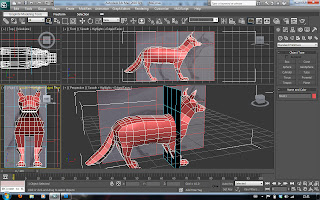 The nose was a very tricky part, just looking at it from a few different angles, it took a lot of time to get it to look decent.
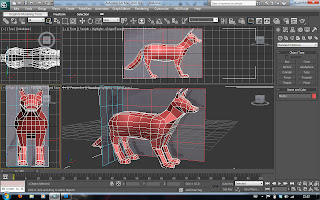
 And here it is, a low poly version of my fox. I saved three copies of this; one for my fox, one for the fox cub, and one for the lion. (Please see following posts).
 The nose was a very tricky part, just looking at it from a few different angles, it took a lot of time to get it to look decent.

 And here it is, a low poly version of my fox. I saved three copies of this; one for my fox, one for the fox cub, and one for the lion. (Please see following posts).
Modelling; Fox Part 1
I have finally sat down and started modelling. Firstly, my Fox (mother). The images below show the first few stages of development of my polygon. (Starting with a cuboid, 3 x 3 x 5 segments).
 'Moulding' the vertices allowed the shape of the fox to be formed. A side view was determined first.
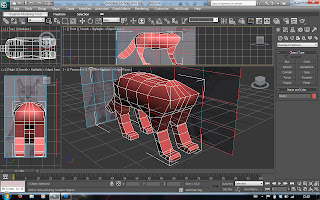
The 'symmetry' modifier was used to save a lot of work, make the model accurate, and give a visual representation of the whole model whilst I was working. (I thought previously you could only apply the modifier to the finished product, but this way allowed better accuracy, especially when it came to the next section: depth; more specifically the nose).


Friday 12 March 2010
Character Profiles
Here are the guides I created for my profiles;
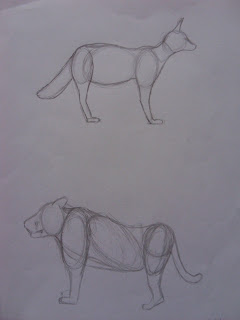
Below are some profiles of my two main characters; the lion and the fox mothers.
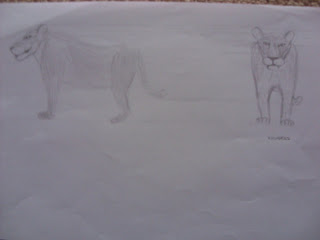
 I have done a side and front view so I can easily create my models in 3DS max. Now on with the modelling!
(Granted they aren't quite accurate, as you can see the guidelines are a tad wonky, but I intend to play with these rough designs in MAX anyway...)
Tuesday 9 February 2010
Storyboard

Here is a storyboard for my animation. Having concocted a few initial ideas, I chose to pursue that which followed the fable closely. (Please click the image to enlarge it).
The Lioness sits with her cub and is approached by a vixen and her numerous cubs. (2-4 i think).
There is a close up of the Vixen's face as she mocks the quantity of the lioness' litter against her own.
A pan shows the litter she (speaks) of, with them fidgeting.
There is a close up of the Lioness who is smug, and not bothered by the vixen.
She imagines the Vixen's cubs grown up, scavenging for scraps in an urban area, low to the ground and thought of as scum.
(With a possible cut to the lioness' face again with a change of expression from sadness in mockery, to evil in her eyes, an fire as she thinks about...)
She then imagines her own cub grown up, the majestic, powerful KING OF THE JUNGLE surveying his domain, the many acres of land that he claims as his own.
Thoughts On My Animation
I have been thinking about my animation on and off for the last week, and have decided on my fable. I have chosen the Vixen and the Lioness; "Quality is better than Quantity". This is a very meaningful message, and I think I can portray it well.
I think I will try to keep to the fable as it reads as best I can, although not with speaking animals. I may just have subtitles, or I could not use words at all and try to make the eyes do the talking with close up shots. For example the Vixen with a wide smile on her face, whilst the Lion looks almost not acknowledging her expression. It would be easier to not have to worry about speech, but I think this could give the animation a lot more impact. If the characters look cartoon like then I could get away with voices, but if they look more realistic, a voice may make it less effective.
It did also cross my mind to maybe change the animals (I enquired as to whether we could, and as long as the message is conveyed well it is acceptable to do so), although I don't think I could portray the message of quality better than with the majestic Lion, king of the jungle. I may change the vixen though, if I could find a suitable replacement.
Friday 5 February 2010
Starting to animate in 3DS MAX
Today I learnt the basics of animating in 3DS MAX. I have done two tutorials working with a sphere bouncing, one is more realistic than the other:
(ABOVE) This ball moves around the plane, rotating as it goes, and changing size.
(ABOVE) This ball simulates a ball bouncing. I did use the Graphic Editor to adjust the curvature of the bounces, but I think it could look more realistic.
Below is a screenshot of the Curve Editor in use.

______________
I believe I have chosen the fable I wish to animate for this project, although now I have found that I do not need to stick to the animals that are mentioned in the fable, (so long as the moral or message behind the story is clear), this presents me with a whole new set of choices and decisions to make!
My next post will detail my choice and ideas for the animation.
Friday 29 January 2010
The Vixen And The Lioness
A vixen who was taking her babies out for an airing one balmy morning, came across a Lioness, with her cub in arms.
"Why such airs, haughty dame, over one solitary cub?" sneered the Vixen. "Look at my healthy and numerous litter here, and imagine, if you are able, how proud a mother should feel."
The lioness gave her a squelching look, and lifting up her nose, walked away, saying calmly, "Yes, just look at that beautiful collection. What are they? Foxes! I've only one, but remember, that one is a Lion."
________________
"Quality is better than quantity."
________________
Sourced from http://aesopfables.com
The Four Oxen And The Lion
A lion used to prowl about a field in which Four Oxen used to dwell.
Many a time he tried to attack them; but whenever he came near they turned their tails to one another, so that whichever way he approached them he was met by the horns of one of them.
At last, however, they fell a-quarrelling among themselves, and each went off to pasture alone in a seperate corner of the field.
Then the lion attacked them one by one and soon made an end of all four.
_________________
"United we stand, divided we fall."
_________________
Sourced from http://aesopfables.com
The Eagle And The Fox
An Eagle and a Fox formed an intimate friendship and decided to live near each other.
The Eagle built her nest in the branches of a tall tree, while the fox crept into the underwood and there produced her young.
Not long after they had agreed upon this plan, the Eagle, being in want of provision for her young ones, swooped down while the fox was out, seized upon one of the little cubs, and feasted herself and her brood.
The fox on her return, discovered what had happened, but was less grieved for the death of her young than for her inability to avenge them.
A just retribution, however, quickly fell upon the Eagle.
While hovering near an altar, on which some villagers were sacrificing a goat, she suddenly seized a piece of flesh, and carried it, along with a burning cinder, to her nest. A strong breeze soon fanned the spark into a flame, and the eaglets, as yet unfledged and helpless, were roasted in their nest and dropped down dead at the bottom of the tree.
There, in sight of the Eagle, the Fox gobbled them up.
____________________
"Do unto others as you would have them do unto you"
____________________
Sourced from http://aesopfables.com
My Three Fables
After reading through tens of fables, I have decided on my final three, although I will continue to read a few out of interest. So I may change my mind....
But for now here are my 3 choices;
- The Vixen And The Lioness; "Quality is better than Quantity"
- The Four Oxen And The Lion; "United we stand, divided we fall"
- The Eagle And The Fox; "Do unto others as you would have them do unto you"
I did like The Ant and The Chrysalis, with the moral of "Appearances are deceptive", but butterflies and insects don't interest me visually as much as my choices, and I want to enjoy making my animation and models!
My third choice reflects my first post idea "Treat people as you wish to be treated".
The Task Ahead
First Impressions of the task ahead are positive.
I have always been a lover of hidden messages and meanings (as you can tell by my last 3D project!) (http://scoobster17-3dma.blogspot.com/)
I will find his quite interesting I am sure and can use this module to further my skill in 3D work and using 3DS MAX software.
I am not familiar with Aesop's Fable's, obviously I know a couple of the stories; The Boy Who Cried Wolf, The Hare and The Tortoise, and more, but I would like to research the fables more and use stories that are less well known and perhaps more important, or more relevant to what I believe.
_____
*EDIT
One moral I have always liked is "Treat others as you wish to be treated". Perhaps I could use this message if it is conveyed by a Fable?
Subscribe to:
Posts (Atom)